TBD
This is the multi-page printable view of this section. Click here to print.
User Interface
- 1: Toolbar
- 2: Resources
- 2.1: Gateway
- 2.2: MySensors
- 2.3: Tasmota
- 2.4: PhilipsHue
- 2.5: System Monitoring
- 3: Dashboard
- 4: Operations
- 4.1: Tasks
- 4.2: Schedules
- 4.3: Handlers
- 4.4: Forward Payload
- 4.5: Load Variables
- 4.6: Parameters to Handler
- 4.7: Notify Handlers
- 4.8: Javascript
- 4.9: Webhook
- 4.10: Template
- 5: Settings
- 5.1: System
- 5.2: Backup and Restore
1 - Toolbar
Toolbar component contains various elements like filters, Action Buttons, Quick Buttons.
Toolbar will be placed on top of all the list resources page.

Filters
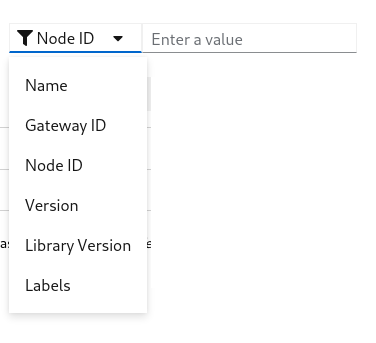
- By clicking the
Filtersbutton you can see the list of available filter options - Each filter is a field on the resource
- Selecting more than one filter applies
ANDlogic - By selecting a filter you can see one of the following filter
- Text input filter
- Selection filter
- Labels filter
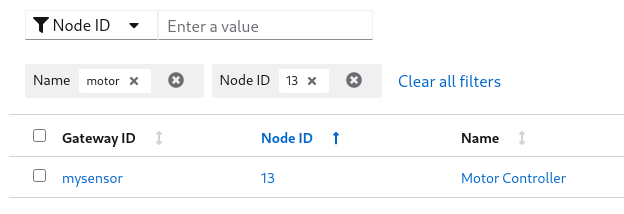
Text input filter
This filter works in two different modes
- Regex
- In this mode performs case insensitive and is the value contains search
- Is In
- When supplying same option filter more than once, filter mode for that field switch to Is In
- Verifies that particular field has one of the input
Selection filter
This filter works same as Text input filter
Labels filter
Label filter is a special filter used to filter a resource by labels.
You can supply label in the format of key=value
Examples:
- location=external
- zone=south
- version=2.0.2
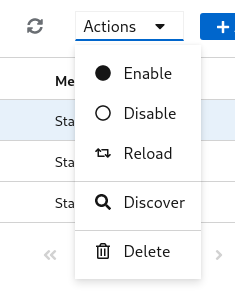
Action Buttons
- By selection one or more number of row, the action buttons drop down will be enabled
- Selecting an action on the dropdown apply to all the selected resources
Quick Buttons
- Couple of quick buttons will be on the toolbar
 - Refresh button, reloads the resources from the server
 - Add button, takes to add resource page
2 - Resources
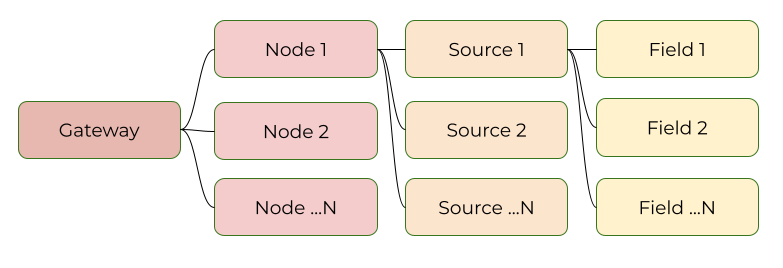
Resources are the key components in MyController.
Gateway
Gateway is the entry and exit point in MyController. It connects your network and MyController.
Node
Node is a kind of end point in the sensor world.
Source
Source is a single or group of fields
Field
Field is a final measurement point
Example
- Take a couple ESP8266 boards
- Those ESP8266 boards can be operated via
MQTTprotocol - Each board has sensors like,
temperature,humidity,relay,push button, etc., - Now relate with MyController resources
- All the boards can be connected via
MQTTto MyController - is calledgateway - A board is a endpoint - is called
node temperature,humidity, etc., measurements are calledfield- group of
fieldsor a singlefieldgoes under asource
- All the boards can be connected via
2.1 - Gateway
MyController supports different type of providers network.
Each network can be connected to MyController via a gateway.
Gateway can be added/updated/deleted from the Resources >> Gateway page
Supported Providers list
Common Configurations
-
Form View
-
YAML View
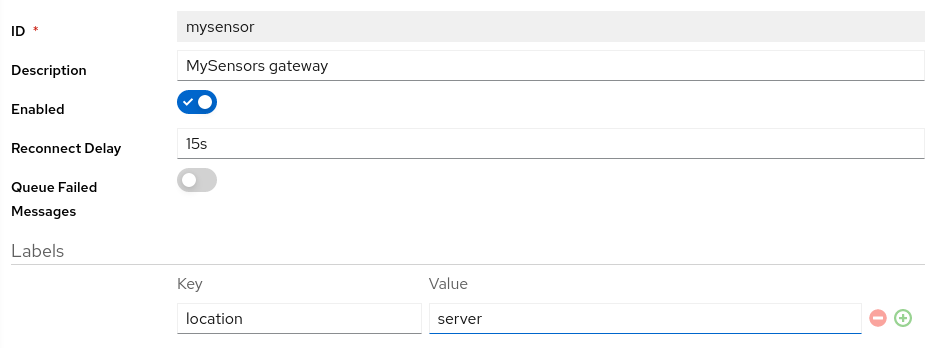
id: mysensor # (1) description: MySensors gateway # (2) enabled: true # (3) reconnectDelay: 15s # (4) labels: # (5) location: core # (6)idof the gateway. You cannot modify this field laterdescriptionof the gatewayenabled- You can enable or disable to disconnect from provider network.reconnectDelay- if the gateway disconnected from the provider network for some reason, will be reconnected automatically after this delaylabels- labels are a key value pair used across the systemlabels.locationthis is a kind of filter used to restrict to run this gateway to a specific location(s)
Note
Theid field can not be changed later
Power of the labels
We can restrict to load a gateway to the specific host.
For example you are running gateway service on multiple hosts
and all the gateway service connected to MyController via message bus.
you have connected a serial port on Host B.
When you add a gateway configuration on MyController, it sends the configuration details to all the gateway listener services.
So all the gateway listeners are try to look that serial port on their hosts. expect from Host B all other gateway reports failed to load. To avoid these kind of situation, we have introduced labels.
When we start a gateway service on a host, include label based filter.
That gateway service listens only it is own configuration.
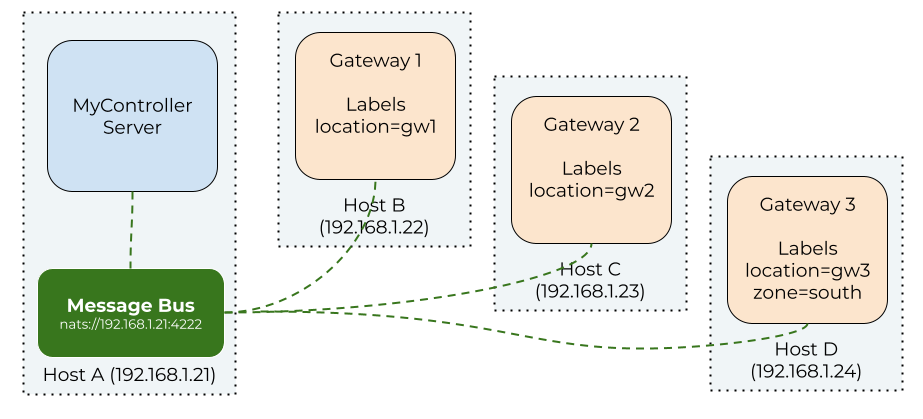
In the above setup, if we include labels as location=gw2 on the configuration, It loads on the Host C gateway service.
Other gateways from the different hosts will ignore this configuration.
Provider Configurations
Message Logger Configurations
Message logger is recording received and transmitted messages.
Type of Message Logger
None- disable message logging systemFile Logger- records the messages into a file (disk)
Note
This feature is available for all selected providers.-
Form View

-
YAML View
messageLogger: type: file_logger # (1) flushInterval: 5s # (2) logRotateInterval: 6h # (3) maxSize: 1MiB # (4) maxAge: 24h # (5) maxBackup: 3 # (6)messageLogger.typemessage logger type. supportfile_loggerandnonemessageLogger.flushIntervalhow long once received message to be dumped to disk from memorymessageLogger.logRotateIntervalcreates new file after this intervalmessageLogger.maxSizeif the size reaches themaxSize, creates new filemessageLogger.maxAgeif the age reaches themaxAge, creates new filemessageLogger.maxBackupretention files count
2.2 - MySensors
MySensors is an open source hardware and software community focusing on do-it-yourself home automation and Internet of Things. To know more about MySensors network follow this link
Provider Specific key points
- In a network MySensors can have maximum of 254 nodes
- node id
0is always a gateway node - node id
1to254can be allocatable to any node - Supported features in MyController
OTAfeatures / Firmware updatereboota nodereseta node- get a node info
- discover nodes
Heartbeatrequest- Response to internal message like
I_TIME,I_CONFIG,I_ID_REQUEST - Assigns NodeId if nodeId set as
AUTOon a node
Not implemented / supported features (that is supported on MyController 1.x)
- Handle sleeping nodes
- There is no node alive check
Common Configuration
-
Form view
-
YAML View
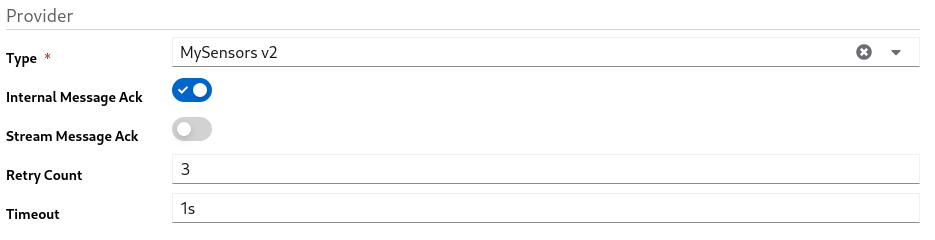
provider: type: mysensors_v2 # (1) enableInternalMessageAck: true # (2) enableStreamMessageAck: false # (3) retryCount: 3 # (4) timeout: 1s # (5)typeshould be selected asmysensors_v2enableInternalMessageAckenable acknowledgement for internal messagesenableStreamMessageAckenable acknowledgement for streaming messages. ie: OTA/firmware messagesretryCount- if do not receive the acknowledgement on the specifiedtimeout, keeps resend the message till it reaches the retryCounttimeout- wait for the acknowledgement till this timeout
Protocols
MySensors gateway supports the following protocols
Protocol Configuration - MQTT
-
Form view
-
YAML View
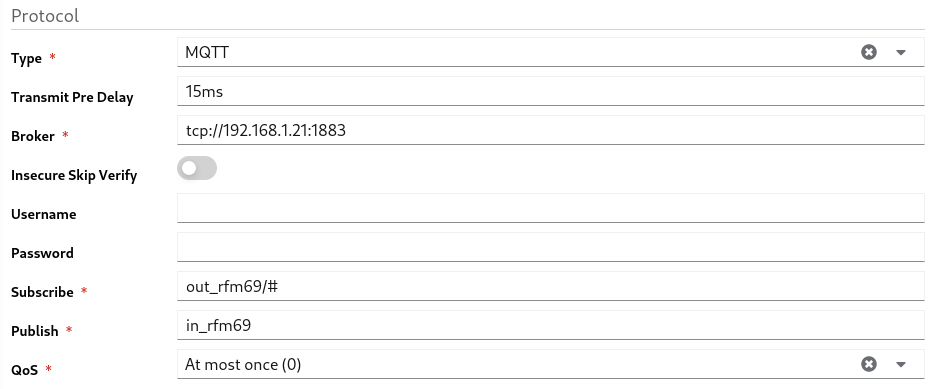
provider: protocol: type: mqtt # (1) transmitPreDelay: 15ms # (2) broker: tcp://192.168.1.21:1883 # (3) insecureSkipVerify: false # (4) username: '' # (5) password: '' # (6) subscribe: out_rfm69/# # (7) publish: in_rfm69 # (8) qos: 0 # (9)typetype of the protocol. here it should bemqtttransmitPreDelay- wait till this time to avoid collision and sends the data to provider networkbrokermqtt broker urlinsecureSkipVerifyif you want to skip the insecure ssl, enable this optionusernameusername of the mqtt broker. if it isanonymousleave it as a blankpasswordif username supplied, password should be supplied. otherwise leave it as a blanksubscribetopic to be subscribed to get messages from MySensors gatewaypublishtopic to be used to post data from MyController to MySensors networkqosMQTT qos
Note
It is important to include/# at the end of subscription topic to receive from all the nodes. example: out_rfm69/#
Protocol Configuration - Serial
-
Form view
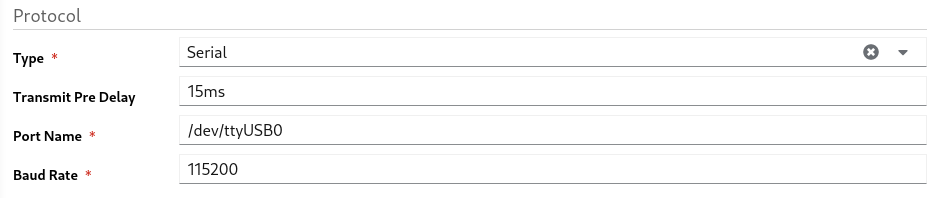
-
YAML View
provider: protocol: type: serial # (1) transmitPreDelay: 15ms # (2) portname: /dev/ttyUSB0 # (3) baudrate: 115200 # (4)typeof the protocol. here it should beserialtransmitPreDelay- wait till this time to avoid collision and sends the data to provider networkportnamename of the serial portbaudratebaud rate of the serial port
Protocol Configuration - Ethernet
-
Form view
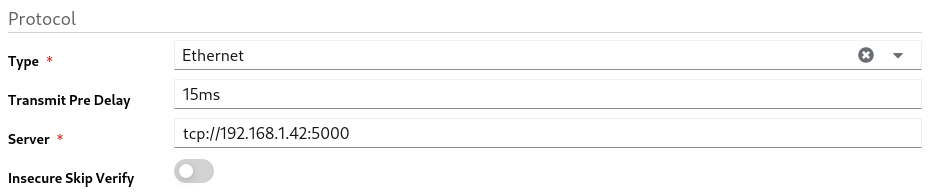
-
YAML View
provider: protocol: type: ethernet # (1) transmitPreDelay: 15ms # (2) server: tcp://192.168.1.42:5000 # (3) insecureSkipVerify: false # (4)typeof the protocol. here it should beethernettransmitPreDelay- wait till this time to avoid collision and sends the data to provider networkserverethernet server address with portinsecureSkipVerifyif you want to skip the insecure ssl, enable this option
2.3 - Tasmota
Tasmota is an Open source firmware for ESP8266 devices
Common Configuration
-
Form view

-
YAML View
provider: type: tasmota # (1)typeshould be selected astasmota
Protocols
Tasmota gateway supports the following protocols
Protocol Configuration - MQTT
-
Form view
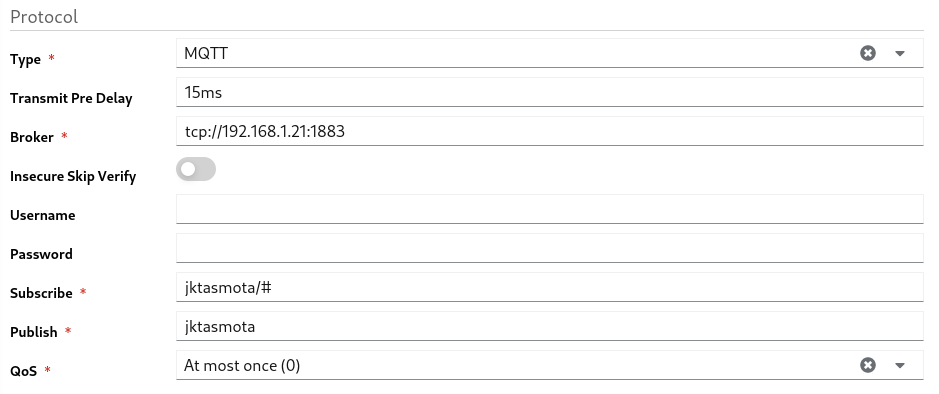
-
YAML View
provider: protocol: type: mqtt # (1) transmitPreDelay: 15ms # (2) broker: tcp://192.168.1.21:1883 # (3) insecureSkipVerify: false # (4) username: '' # (5) password: '' # (6) subscribe: jktasmota/# # (7) publish: jktasmota # (8) qos: 0 # (9)typetype of the protocol. here it should bemqtttransmitPreDelay- wait till this time to avoid collision and sends the data to provider networkbrokermqtt broker urlinsecureSkipVerifyif you want to skip the insecure ssl, enable this optionusernameusername of the mqtt broker. if it isanonymousleave it as a blankpasswordif username supplied, password should be supplied. otherwise leave it as a blanksubscribetopic to be subscribed to get messages from MySensors gatewaypublishtopic to be used to post data from MyController to MySensors networkqosMQTT qos
Note
It is important to include/# at the end of subscription topic to receive form all the nodes. example: jktasmota/#
MQTT configuration on the Tasmota node

The following changes needs to be updated on the Tasmota node MQTT settings to connect with MyController
Topic- should be updated astasmota_%06XFull Topic- should be updated asjktasmota/%prefix%/%topic%/- here
jktasmotacan be any name, should be in lowercase and special characters are not allowed
- here
To know more about MQTT settings on Tasmota follow this guide
2.4 - PhilipsHue
PhilipsHue is smart home lighting.
To know more about PhilipsHue developer API follow this link
Configuration
-
Form view
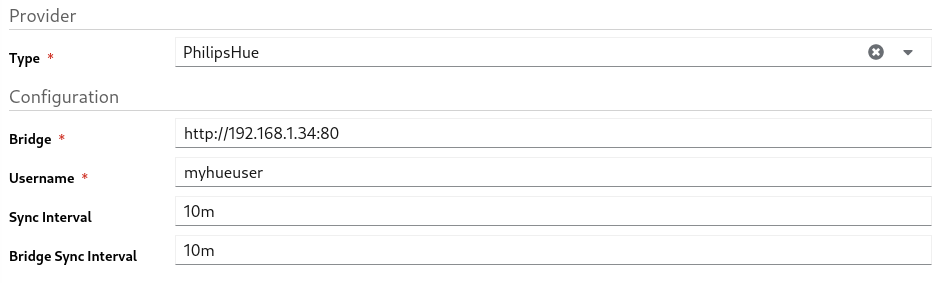
-
YAML View
provider: type: philips_hue # (1) host: http://192.168.1.34:80 # (2) username: myhueuser # (3) syncInterval: 10m # (4) bridgeSyncInterval: 10m # (5)typeshould be selected asphilips_huehost- PhilipsHue bridge address to communicateusernameof the PhilipsHue bridgesyncInterval- polls the connected devices status from the PhilipsHue bridgebridgeSyncInterval- gets the PhilipsHue bridge configurations on this interval
2.5 - System Monitoring
System Monitoring is an internal plugin developed and maintained by MyController
Configuration
- Form view
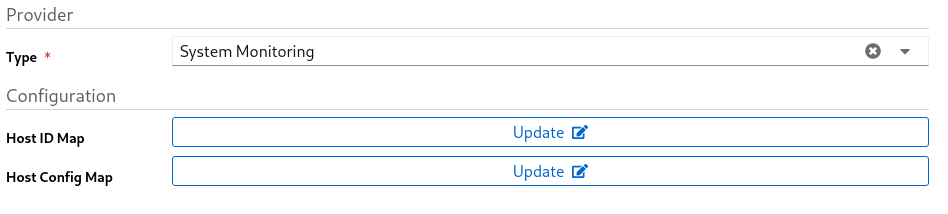
- YAML View
provider: type: system_monitoring # (1) hostIdMap: {} # (2) hostConfigMap: {} # (3)typeshould be selected assystem_monitoringhostIdMap- is a group of key value maphostConfigMapconfigurations of monitoring resources
Host ID Map Configuration
Host ID Map (hostIdMap) is used to map the real host id with a friendly name
Samples:
be0164ad-6f25-4448-b691-567946392b47: rpi_1
a574ac8d-4c9f-40d6-b0ce-bbc7d98cd87d: rpi_2
Here be0164ad-6f25-4448-b691-567946392b47 is the actual id of the host and it is mapped with rpi_1.
If data received from this node, The node name will be as rpi_1
Host Config Map Configuration
Host Config Map (hostConfigMap) is used to configure a specific node(s)
rpi_1: # (1)
  disabled: false # (2)
  cpu: # (3)
    interval: 1m
    cpuDisabled: false
    perCpuDisabled: false
  disk: # (4)
    interval: 1h
    disabled: false
    data:
      disk_root:
        disabled: false
        name: "Root"
        path: /root
        unit: MiB
      disk_storage:
        disabled: false
        name: "Storage"
        path: /storage
        unit: MiB
  memory: # (5)
    interval: 1m
    memoryDisabled: false
    swapMemoryDisabled: false
    unit: MiB
  process: # (6)
    interval: 1m
    disabled: false
    data:
      influxd:
        disabled: false
        name: "InfluxDB"
        unit: MiB
        filter:
          cmdline: influxd
      adguard:
        disabled: false
        name: "AdGuard"
        unit: MiB
        filter:
          cmdline: >-
            /opt/adguardhome/AdGuardHome --no-check-update -c
            /opt/adguardhome/conf/AdGuardHome.yaml -h 0.0.0.0 -w
            /opt/adguardhome/work
      mycontroller:
        disabled: false
        name: "MyController"
        unit: MiB
        filter:
          cmdline: /app/mycontroller-all-in-one -config /app/mycontroller.yaml
      natsio:
        disabled: false
        name: "NatsIO"
        unit: MiB
        filter:
          cmdline: nats-server --config /etc/nats/nats-server.conf
      proc_gw:
        disabled: false
        name: "MYC GW"
        unit: MiB
        filter:
          cmdline: ./mycontroller-gateway -config gateway.yaml
  temperature: # (7)
    disabledAll: false
    interval: 30s
    enabled: []
rpi_2: # (1)
  cpu:
    # ...
- node_id - id of the node or host
disabled- settrueto disable data from this node. default value:falsecpuconfigurationsdiskconfigurationsmemoryconfigurationsprocessconfigurationstemperatureconfigurations
CPU Configurations
cpu:
  interval: 1m # (1)
  cpuDisabled: false # (2)
  perCpuDisabled: false # (3)
interval- metric measurement intervalcpuDisabled- disable overall CPU metrics dataperCpuDisabled- disable individual CPU(s) metrics data
Disk Configurations
disk:
  interval: 1h # (1)
  disabled: false # (2)
  data: # (3)
    disk_root: # (4)
      disabled: false # (5)
      name: "Root" # (6)
      path: /root # (7)
      unit: MiB # (8)
    disk_storage:
      disabled: false
      name: "Storage"
      path: /storage
interval- metric measurement intervaldisabled- disable the all the disk metricsdata- is a map of disk configurations- This id will be used as
fieldIdin MyController, use lowercase, no special characters,_allowed disabled- disable this particular disk metricsname- will be used as field namepath- disk path used to measure the usage detailsunit- units guide
Memory Configurations
memory:
  interval: 1m # (1)
  memoryDisabled: false # (2)
  swapMemoryDisabled: false # (3)
  unit: MiB # (4)
interval- metric measurement intervalmemoryDisabled- enable/disable memory measurementswapMemoryDisabled- enable/disable swap measurementunit- units guide
Process Configurations
process:
  interval: 1m # (1)
  disabled: false # (2)
  data: # (3)
    influxd: # (4)
      disabled: false # (5)
      name: "InfluxDB" # (6)
      unit: MiB # (7)
      filter: # (8)
        cmdline: influxd # (9)
    mycontroller:
      disabled: false
      name: "MyController"
      filter:
        cmdline: /app/mycontroller-all-in-one -config /app/mycontroller.yaml
interval- metric measurement intervaldisabled- disable the all the process metricsdata- is a map of process configurations- This id will be used as
fieldIdin MyController, use lowercase, no special characters,_allowed disabled- disable this particular process metricsname- will be used as field nameunit- units guidefilter- used to get a specific filtercmdline- one of the key used to filter a process
Supported keys in the filter
pid- Process IDcmdline-cwd- client’s Current Working Directoryexe-name-nice- nice value of the processppid- Parent Process IDusername-
Measurement Units
Bye default all the values reported in bytes.
We have an option to convert the bytes to more readable values.
Update unit on the supported resources.
If you want the values in bytes leave the unit field as blank or remove it completely
Supported units: KiB, MiB, GiB, TiB, PiB, EiB
- KiB - Kibibytes (10241 bytes)
- MiB - Mibibytes (10242 bytes)
- GiB - Gibibytes (10243 bytes)
- TiB - Tebibytes (10244 bytes)
- PiB - Pebibytes (10245 bytes)
- EiB - Exbibytes (10246 bytes)
Note
Units are case sensitive. If the specified unit is not in the above list, returns the value as bytes3 - Dashboard
TBD
4 - Operations
TBD
4.1 - Tasks
TBD
4.2 - Schedules
Holds a collection of schedules.
Schedules are executed by a scheduler service.
Schedule can bse used for different use cases.
The most famous one is turn ON a light at specific time and turn OFF a light at a specific time.
But in MyController it is not limited to lights. You can control variety of resources.
Schedule has a different sections. All the sections are explained here.
Important
Schedules will be executed based on the system timezone.If you change the system timezone, it is mandatory to restart the MyController service.
Identity
Form View

YAML View
id: my_first_schedule # (1)
description: This is my first schedule # (2)
enabled: true # (3)
id- should be a unique identifierdescription- add description about this scheduleenabled- enable/disable this schedule
Labels
You can add any number of labels. Labels can be used to filter a group of schedule.
Labels can be used to perform an action on a group schedules.
Form View

YAML View
labels:
  group: essential
Validity
Validity is a special feature. You can control when this schedule should be effective.
All the fields are optional. By omitting a field gives different meanings
To get activate this feature validity should be enabled
Date and Time
Based on the given fields, validity reacts as follows,
-
If non of the fields entered - valid for all the time.
-
date.from- schedule will be valid from the givenfrom date.
There is nofrom timeentered here, butfrom dateis available. Hencefrom.timewill be calculated as00:00:00
Example:2021-09-16becomes2021-09-16 00:00:00 -
date.to- schedule will be valid till the givento date.
There is noto timeentered here, butto dateis available. Henceto.timewill be calculated as23:59:59
Example:2021-09-24becomes2021-09-24 23:59:59 -
date.from,time.from- schedule will be valid from the givenfrom dateandfrom time. -
date.to,time.to- schedule will be valid till the givento dateandto time. -
date.from,date.to,time.from,time.to- schedule can be valid between thefrom date/time~to date/time. -
validateTimeEveryday=>Disabled- valid exactlyfrom date/time~to date/time.
Example:2021-09-16 11:15:00to2021-09-24 19:00:00 -
validateTimeEveryday=>Enabled- between these date and the time valid for every day.
Example: between2021-09-16to2021-09-24- time is valid for every day between11:15:00to19:00:00
Form View

YAML View
validity:
  enabled: true
  date:
    from: '2021-05-14'
    to: '2021-06-21'
  time:
    from: '00:00'
    to: '23:59'
  validateTimeEveryday: false
Schedule Type
Schedule supports different types.
Repeat
Repeat is a super simple schedule.
- Executes the schedule on the specified
intervaltill it reaches therepeat count. - Set
repeat countto0to keep on repeating.
Note
Very first execution starts after the giveninterval.
Cron
Cron is a time-based job scheduler in Unix-like computer operating systems.
In MyController in addition to that, it supports seconds field.
Refer Cron wikipedia page to know more about cron.
┌───────────── second (0 - 59)
| ┌───────────── minute (0 - 59)
│ | ┌───────────── hour (0 - 23)
│ | │ ┌───────────── day of the month (1 - 31)
│ | │ │ ┌───────────── month (1 - 12)
│ | │ │ │ ┌───────────── day of the week (0 - 6) (Sunday to Saturday;7 is also Sunday on some systems)
│ | │ │ │ │
│ | │ │ │ │
│ | │ │ │ │
* * * * * *
The first field second is optional, you can omit it.
Also supports @yearly, @monthly, @weekly, @daily (or @midnight), @hourly
Simple
Simple is a friendly schedule type.
It supports different type of frequencies.
Schedule executes on the specified time, if the day meets the specified frequency.
Time can be specified in the format of hh:mm:ss. hours should be in 24 hours format
Examples:
05:00:00- 5 AM12:30:20- 12:30:20 PM17:15:00- 5:15 PM
Frequency - Daily
In this mode you can restrict the schedule to the selected week days.
- Possible select multiple days of a week.
- Schedule executes on the selected days of the week.
Frequency - Weekly
In this mode you can restrict the schedule to particular week day.
- Select a day in week.
- Schedule executes on the selected day of the week.
- In simple words, only once in a week.
Frequency - Monthly
In this mode you can restrict the schedule to particular day of month.
- Select a date in a month
- Schedule executes on the selected date of the month
- In simple words, only once in a month
Note
If you select non-common date, ie:29, 30, and 31The schedule execution will be skipped for a month, if it does not have the date mentioned above.
Frequency - On Date
In this mode you can restrict the schedule to particular date and time.
- This schedule executes only once in a life time.
Sunrise
Sunrise works similar to Simple schedule, expect the time part.
Here explained only about the time part. refer Simple schedule for other options.
Based on the GEO Location configured for the system,
Sunrise time will be calculated. This calculation happens every day at midnight of the system timezone.
Offset
Offset used to calculate the exact time to execute the schedule.
Offset is a time duration. Refer duration guide for the detailed information.
Examples:
10m- executes 10 minutes after the sunrise time-10m- executes 10 minutes before the sunrise time1h20m- executes 1 hour and 20 minutes after the sunrise time-1h20m- executes 1 hour and 20 minutes before the sunrise time
Sunset
Sunset works similar to Simple schedule, expect the time part.
Here explained only about the time part. refer Simple schedule for other options.
Based on the GEO Location configured for the system,
Sunset time will be calculated. This calculation happens every day at midnight of the system timezone.
Offset
Offset used to calculate the exact time to execute the schedule.
Offset is a time duration. Refer duration guide for the detailed information.
Examples:
10m- executes 10 minutes after the sunset time-10m- executes 10 minutes before the sunset time1h20m- executes 1 hour and 20 minutes after the sunset time-1h20m- executes 1 hour and 20 minutes before the sunset time
Load variables
Load variables is an optional configuration.
Follow Load Variables Guide for the detailed configuration.
Use variables when you want to,
- play with Javascript
enableordisableParameters to handler
Load Custom Variables
Sometimes you may want to do some calculations or based on a value you want to set something,
In those cases Load Custom Variables will be used.
Types
- None
- Javascript
- Webhook
None
Whe you do not want to use Load Custom Variables feature, use None option.
Javascript
Follow Javascript Guide for the details.
Webhook
Follow Webhook Guide for the details.
Parameters to Handler
Follow Parameters to Handlers Guide for the detailed configuration.
Notify Handlers
Follow Notify Handlers Guide for the detailed configuration.
4.3 - Handlers
Handlers are performing an action based on the input parameters.
Different type of handlers supported by MyController.
Handler is a plugin component.
Type of Handlers
Note
Some of the configurations in the handler can be overrides by the input parameters.Noop Handler
Noop is a No Operation handler. It does nothing.
The idea behind Noop handler is, in the future plan to introduce hidden handlers externally.
Right now, there is no use.
Resource Handler
Resource handler sends payload to the nodes, performs an actions on resource, operation, etc.,
Email Handler
Sends email to the recipients. Supports smtp server.
Form View
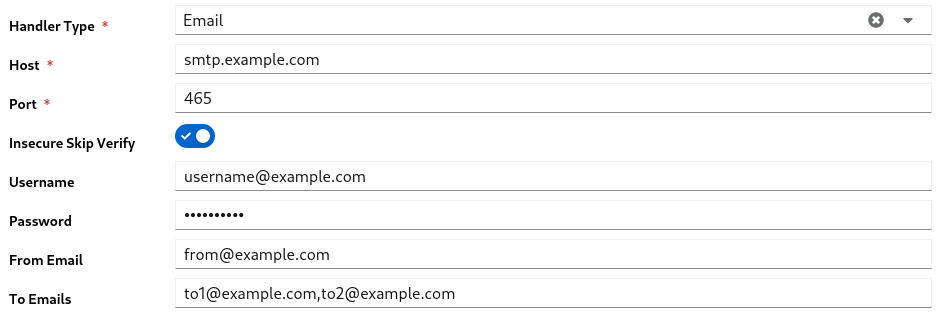
YAML View
type: email # (1)
spec:
  host: smtp.example.com # (2)
  port: 465 # (3)
  insecureSkipVerify: true # (4)
  username: username@example.com # (5)
  password: mypassword # (6)
  fromEmail: from@example.com # (7)
  toEmails: to1@example.com,to2@example.com # (8)
typeshould be selected asemailhost- email server hostport- email server portinsecureSkipVerify- enables/disables insecureusernameof the accountpasswordof the accountfromEmailfrom email addresstoEmailsto emails list comma separated
Telegram Handler
Sends telegram message to persons and/or groups.
Follow this guide to get the telegram token, chat_id and group_id
Form View

YAML View
type: telegram # (1)
spec:
  token: 500000000:AAHKsdsdckwendlwwqNKJBmbjknm9jA # (2)
  chatIds: # (3)
    - '200000000'
    - '300000000'
typeshould be selected astelegramtokenof the telegram accountchatIds- list of chat ids or group ids
Backup Handler
Backup handler performs backup operation and keeps the backup archives at the specified target location
Important
Backup covers only the storage database and firmware’s.Metrics data will not be backed up.
User has to handle metrics database backup/restore themselves.
Form View
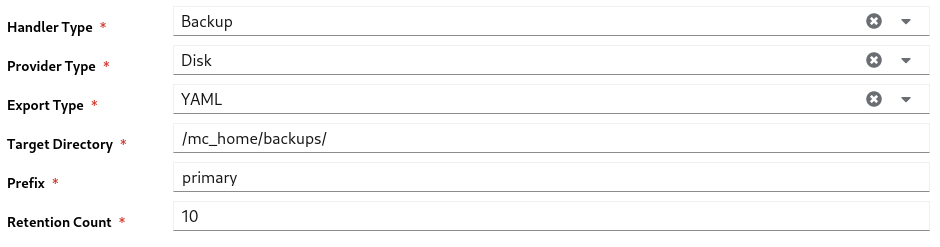
YAML View
type: backup # (1)
spec:
  providerType: disk # (2)
  spec:
    storageExportType: yaml # (3)
    targetDirectory: /mc_home/backups/ # (4)
    prefix: primary # (5)
    retentionCount: 10 # (6)
typeshould be selected asbackupproviderTypeshould be selected asdisk. Only this provider supported nowstorageExportType- storage database data will be exported in this format. options:yaml,jsontargetDirectory- location to keep the backup archivesprefixof the backup fileretentionCount- If the number of backup archives goes beyond this count,older files will be deleted permanently.
4.4 - Forward Payload
Forward Payload sends the payload from a source field to destination field.
Supports only for the Field resource.
- Navigate to
Operations >> Forward Payload - Click on
Addbutton
Form View
- On the
Source FieldandDestination Fieldtype Field ID, displays matching ids as a dropdown.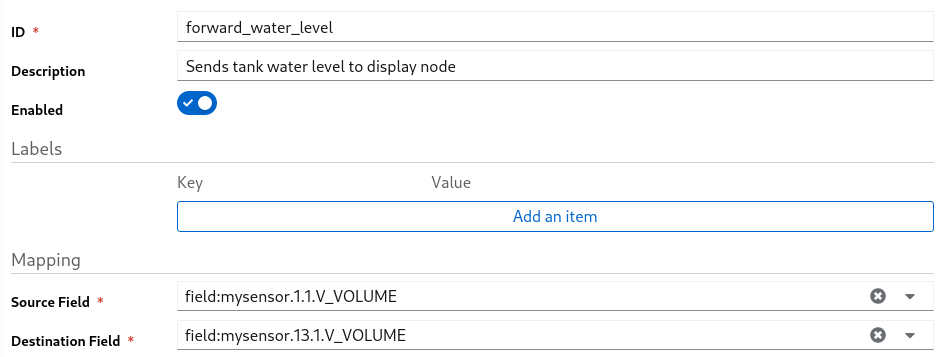
YAML View
id: forward_water_level # (1)
description: Sends tank water level to display node # (2)
enabled: true # (3)
srcFieldId: field:mysensor.1.1.V_VOLUME # (4)
dstFieldId: field:mysensor.13.1.V_VOLUME # (5)
id- should be unique across forward payloaddescriptionof the entityenable- enable/disable this entrysrcFieldId- source field iddstFieldId- destination field id
4.5 - Load Variables
Load Variables is a sub configuration in a Task or in a Schedule.
You can load any number of variables for the further operations.
Form View

Variable Nameis used a internal reference for further operations. should be unique.- Add new variable click
+icon - To delete a variable click
-icon - By clicking edit icon of a value, can offer to select different data types.
YAML View
In YAML view, the data is encoded with base64 format to avoid syntax issues.
variables:
  water_level: >-
    {"type":"resource_by_quick_id","disabled":"","data":"cmVzb3VyY2VUeXBlOiBmaWVsZApxdWlja0lkOiBteXNlbnNvci4xLjEuVl9WT0xVTUUKc2VsZWN0b3I6IGN1cnJlbnQudmFsdWUK"}
  motor_status: >-
    {"type":"resource_by_quick_id","disabled":"","data":"cmVzb3VyY2VUeXBlOiBmaWVsZApxdWlja0lkOiBteXNlbnNvci4xMy4xLlZfU1RBVFVTCnNlbGVjdG9yOiBjdXJyZW50LnZhbHVlCg=="}
Data Types
Following data types are supported in Load Variables.
String
String is static type. It assigns the given value to that variable.
Resource By QuickID
Resource can be selected by their QuickID.
Form View
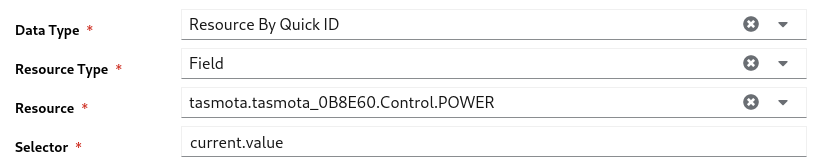
- Select a
Resource Type - enter the
idof the resource, you will get a list of matching resources. Select a resource. - On the
Selectorfield enter the exact path to get value. See Selector Guide
YAML View
type: resource_by_quick_id
data:
  resourceType: field
  quickId: tasmota.tasmota_0B8E60.Control.POWER
  selector: current.value
Resource By Labels
Resource can be selected by their Labels.
Note
If a list of resources received, the very first resource will be taken for further actions.Form View
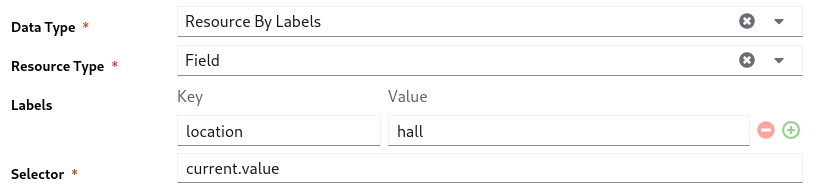
- Select a
Resource Type - enter key value of a label. enter as many labels you want.
- On the
Selectorfield enter the exact path to get value. See Selector Guide
YAML View
type: resource_by_labels
data:
  resourceType: field
  labels:
    location: hall
  selector: current.value
Selector
Selector is dot(.) separated path used to select a value on the given resource.
If the path not found returns empty value.
To make the path, you should know the supported keys on a resource.
To know more about supported keys of a resource,
- go to that particular resource details page
- click on edit
- select the
YAML View.
Some of the references
Resource - Field
current.value- current valuecurrent.timestamp- current value received timestampnoChangeSince- There is no change on the received value from this timeprevious.value- previous valueprevious.timestamp- previous value received timestamp
Resource - Gateway
state.status- status of the gateway. can beup,down,error, etc.,enabled- enabled or disabled
4.6 - Parameters to Handler
Parameters used to send a configuration to handlers.
Based on the the given configuration(via parameter) handler reacts
Form View

Parameter has two fields,
- to add new parameter click
+icon - to remove a parameter click
-icon Nameof the field should be unique. There is no special meaning for the name. use it as your reference.Value- value can be one of the type mentioned here. To update a value click on edit icon
YAML View
In YAML view, the data is encoded with base64 format to avoid syntax issues.
handlerParameters:
  run_backup: >-
    {"type":"backup","disabled":"","data":"cHJvdmlkZXJUeXBlOiBkaXNrCnNwZWM6CiAgc3RvcmFnZUV4cG9ydFR5cGU6IHlhbWwKICByZXRlbnRpb25Db3VudDogNQogIHRhcmdldERpcmVjdG9yeTogJycKICBwcmVmaXg6ICcnCg=="}
  turn_on_light: >-
    {"type":"resource_by_quick_id","disabled":"","data":"cmVzb3VyY2VUeXBlOiBmaWVsZApxdWlja0lkOiB0YXNtb3RhLnRhc21vdGFfODg3NDIxLkNvbnRyb2wuUE9XRVIKcGF5bG9hZDogJ29uJwpwcmVEZWxheTogMTBzCg=="}
Parameter Types
Parameter types are based on the supported handlers.
Disabled is a common field across all type of parameters.
- a parameter can be enabled or disabled dynamically.
- can be disabled by setting this field as
true - default value for this field is
false
Note
All the parameter values supports template.With template we can update the value or part of the value dynamically.
Template Guide
Resource By Quick ID
Resource can be selected by their QuickID.
Form View
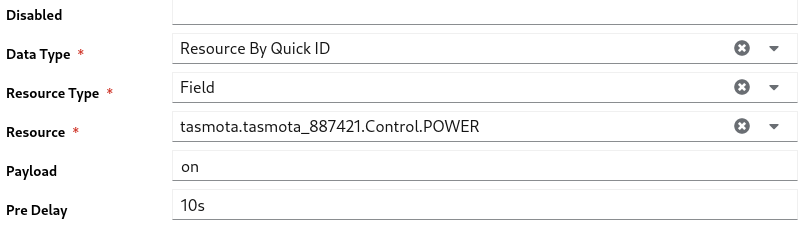
- Select a
Resource Type - enter the
idof the resource, you will get a list of matching resources. Select a resource. - on the payload update the action or value you want to set to the selected resource
Pre Delayis used to wait some time and perform the action.10s- Resource handler waits 10 seconds and sets this value.
Note
Pre delay parameters will be lost on the intermediate restart of the MyController server.
Example:
- You passed a resource parameter with pre delay as 1 hour.
- The parameter passed to resource handler service and this handler can perform the resource action exactly after 1 hour.
- This data is in resource handler service memory.
- If you restart your MyController service, that particular action will be lost and will not be executed.
YAML View
disabled: ''
type: resource_by_quick_id
data:
  resourceType: field
  quickId: tasmota.tasmota_887421.Control.POWER
  payload: 'on'
  preDelay: 10s
Resource By Labels
- This is exactly same as Resource By Quick ID.
- The only different is, selecting resources by Labels
- When filtering with labels it possible to get more than on resource.
- Particular action will be applied to all the resources filter by labels.
Form View
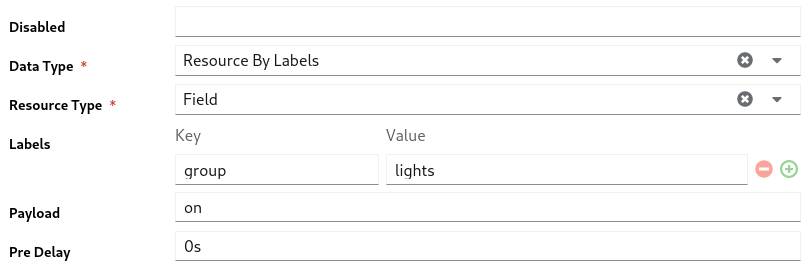
YAML View
disabled: ''
type: resource_by_labels
data:
  resourceType: field
  labels:
    group: lights
  payload: 'on'
  preDelay: 0s
Webhook
TBD
- All the fields in email parameter is optional.
- If non of the fields entered here, taking all the fields from the Email Handler
- The field enter here is taken, for empty values updates from the Email Handler
Form View
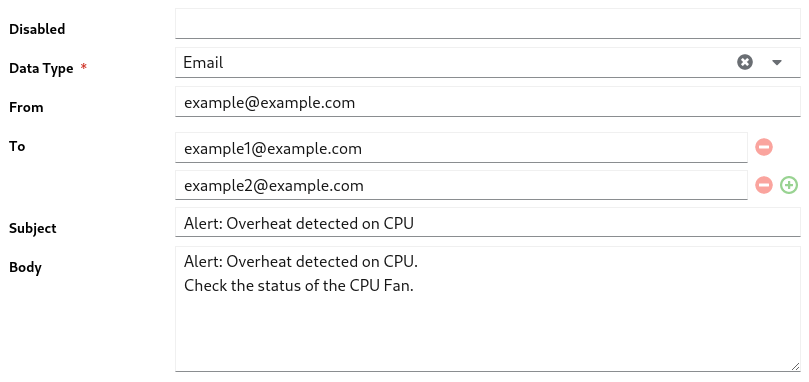
YAML View
disabled: ''
type: email
data:
  from: example@example.com
  to:
    - example1@example.com
    - example2@example.com
  subject: 'Alert: Overheat detected on CPU'
  body: |-
    Alert: Overheat detected on CPU.
    Check the status of the CPU Fan.
Telegram
- other than the
Textall the fields are optional - empty values are taken from Telegram Handler
- telegram supports different
Textparse modes,Text,Markdown,Markdown V2,HTML.
Important
All the syntax are supported fromMarkdown, Markdown V2, HTML.Refer Telegram API Guide for the detailed format options.
Form View
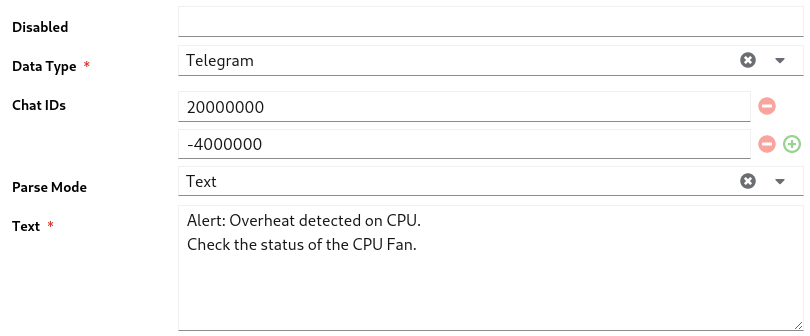
YAML View
disabled: ''
type: telegram
data:
  chatIds:
    - '20000000'
    - '-4000000'
  parseMode: Text
  text: |-
    Alert: Overheat detected on CPU.
    Check the status of the CPU Fan.
Backup
Backup parameter used to execute a backup via a schedule or from a task.
- Other than the
ProviderandRetention Count, all other inputs are optional - empty values are taken from the Backup Handler
- If you enter
Retention Countas0, the value will be taken from the Backup Handler
Restore
To restore a backup follow the Restore GuideForm View
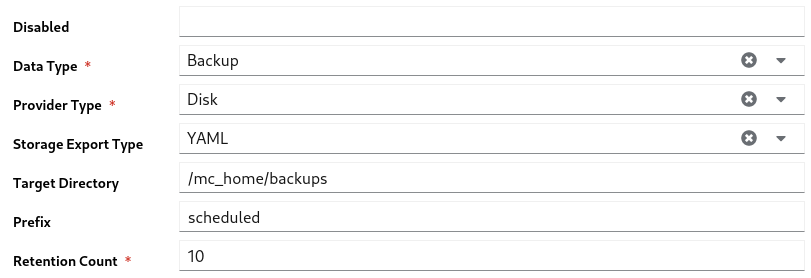
YAML View
disabled: ''
type: backup
data:
  providerType: disk
  spec:
    storageExportType: yaml
    targetDirectory: /mc_home/backups
    prefix: scheduled
    retentionCount: 10
4.7 - Notify Handlers
Handlers should be created prior to this section. Follow Handlers Guide to create a handler.
Notify handlers holds a list of handler ids.
Sends all the parameters to the specified handler services.
Based on the Parameters type a particular Handler service can filters supported type(s) and executes it.
Form View

- Click
+icon to add new handler id - Click
-icon to delete a handler id
YAML View
handlers:
  - telegram_home_group
  - resource_handler
4.8 - Javascript
TBD
4.9 - Webhook
TBD
4.10 - Template
TBD
5 - Settings
TBD
5.1 - System
The system settings has the following configurations
GEO Location
GEO Location address the current location of the server or ask to follow the given location as server location and operate dependent services.
This detail used to calculate Sunrise and Sunset times in Schedule
Form View

Auto Update- Enabling this field can take the server location based on the WAN IP address.
If you want to give the value manually, disable this field.Location Name- Name of the locationLatitudeof the locationLongitudeof the location
YAML View
geoLocation:
  autoUpdate: false
  locationName: Namakkal
  latitude: 11.2189165
  longitude: 78.1586027
Login Page Message
You can enter a message to display on the login page of the console.
The message supports HTML tags.
Form View

YAML View
login:
  message: |-
    This is a private MyController instance. Running in a local Raspberry PI
    <br>Default username and password: admin / admin